syntler.com

DRUMPER 2.3 guide:
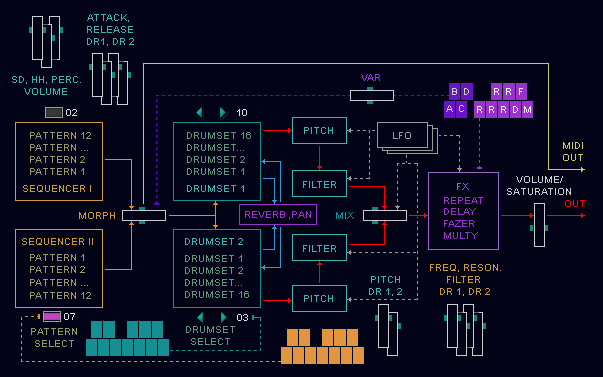
• DRUMPER has two internal sequencers and
creates a rhythmic pattern by morphing
between them. This rhythmic pattern
simultaneously plays two drumsets, the sound of which can be processed and mixed in different ways.
DRUMPER is compatible with any standard MIDI
keyboard or controller and operates
in real-time.
USING:
• Open DRUMPER like a VST instrument.
• Start the host sequencer.
• Click and hold the "ON!" button [31] (short click for sound stop/pause).
• Press the first "PATTERN" key [19].
• Press the "A" key. [22]
• Set the "MORPH" [17] fader to the left.
The "DENSITY" [10]fader must be set in the central position.
 • Select a sequencer I [14].
• Select a pattern for the sequencer I [14].
• Edit this pattern or create a new pattern [12].
• Set the "MORPH" [17] fader to the right.
• Select a sequencer II [20].
• Select a pattern for the sequencer II [20].
• Edit this pattern or create a new pattern [12].
• Set the "MORPH" [17] fader in the center or close to the central position.
• Tune the "A" [23] fader.
• Tune the "DENSITY" [10] fader if you need to.
• Similarly, adjust the "B" key and fader.
• If you select the "A-B" key, DRUMPER will play "A" and "B" variations alternately. You can adjust the time switch to "B" variation using "A-B" fader [23].
• You can select the lines (BD, SD, etc.) [7] which will not be changed when changing the value of the "DENSITY".
• Set the "MIX" [18] fader to the left.
• Select drumset [15].
• Click the "DRUMSETS" menu.
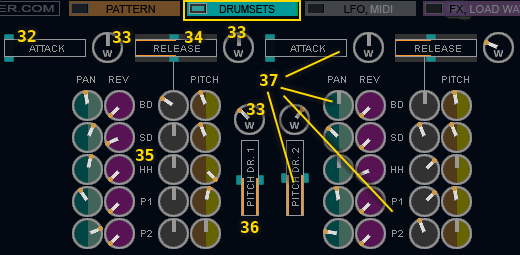 • Tune the "PITCH DR 1" fader [36].
• Select "1" or "2" mode [3] for "PITCH DR. 1" fader. In the "2" mode the value of pitch will be reversed for every drum beat.
• Select modulator to pitch value for each drum line. [4].
If you select "CENTER", the pitch will change only when moving the "PITCH DR 1" fader. You can also select one of the LFOs as a modulator.
• Select "LFO, MIDI" menu.
 • Select LFO waveform [38]. Adjust the faders "SPEED" [40] and "DEEP" [41]. Select the type of synchronization [39].
• You can ajust MIDI out channel [42] and MIDI note for the each line (BD, SD etc.) [43, 44]. The MIDI output is activated the button [45]. The MIDI output supports "MIDI note on", "MIDI note off" and "MIDI note velosity" parameters only. The controllers (pitch, filter, etc.) are not transmitted. The "MIDI note velosity" parametr depends on the setting "ACCENT" knobs.
If the "ACCENT" knob is set to the center , MIDI note Velocity = 100.
If the "ACCENT" knob is set to the minimum , MIDI note Velocity = 76.
If the "ACCENT" knob is set to the maximum , MIDI note Velocity = 127.
• Return to "DRUMSETS" menu.
• Set "ATTACK" [32]and "RELEASE" [34] time for DRUMSET 1.
Adjust the pan, reverb level, release and pitch for each drum line [35].
• Set the "MIX" [18] fader to the right.
Tune dramset 2 in the same way as dramset 1 [37].
• Set the "MIX" [18] fader in the center or close to the central position and select a modulator for this fader [13].
• Click the next "PATTERN" key [19] and select a pair of patterns [14], [20] and a pair of dramsets [15], [21]. Adjust the faders "MORPH" [17], "DENSITY" [10] and "VAR" ("A", "B", "A-B") [22].
Repeat this procedure with all "PATTERN" keys.
• Select "FX, LOAD WAV" menu.
• Tune reverb "TIME" [46], "COLOR" [50] and "WIDTH" [51]. Ajust gate for reverb [47]. The "tail" of the reverb will turn on and off each playing BD, SD, BD+SD, or percussion depending on your choice.
• Tune delay "TIME" [53], "FEEDBACK" [54] and "MIX" [55]. The delay time is automatically synchronized with the tempo of the host sequencer.
• Tune fazer "TIME" [61], "FEEDBACK" [63]and "MIX" [62]. Assign the modulator to fazer time parameter [64]. Select inverted or normal option of the fazer [65]. "Inv" option sets the LFO modulation in opposite phase for left and right channel.
• Tune filter using the "FREQ." [57] and "REZ." [59]faders. Select modulator fo filter [58]. Select inverted or normal option of the filter [56]. Set the filter to the second drum in the same way [60].
• To download wav files click on the download button [52]. DRUMPER supports stereo and mono samples download but will be played back mono.
It is recommended edit samples in any audio editing program before loading. Best thing disable the sample loop. You can adjust the volume of the loaded samples using an "vol" knobs [49]. These samples will sound if you select 17 or 18 drumset using drum select buttons [15, 21]
• Return to "PATTERN" menu and tune the "ACCENT" [11]knobs if you need to. You can boost or reduce the volume for each sequencer step. The "MIDI note velosity" (MIDI out) parametr depends on the setting "ACCENT" knobs. If the "ACCENT" knob is set to the center , MIDI note Velocity = 100.
If the "ACCENT" knob is set to the minimum , MIDI note Velocity = 76.
If the "ACCENT" knob is set to the maximum , MIDI note Velocity = 127.
• Play DRUMPER using a virtual keyboard or MIDI.
• You can change the patterns and drumsets using "PATTERN" keys or MIDI keys 60-71.
• If the "LINK KEYS / UNLINK" button [16] is set to the "UNLINK" position you can change the patterns and dramsets independently. To change dramsets use MIDI keys 48-59, to change patterns - keys 60-71.
• If the "USER / PRESET" button [9] is set to the "USER" position, then when changing presets (a MIDI programm change)settings only will change, but the selected drumsets will not be changed. • Fx processor is controlled by the "FX" keyboard or MIDI.
MIDI keys 76-80 - "REPEAT" effect [20],
key 81 - "DELAY" effect [26],
key 82 - "FAZER" effect [27],
key 83 - "MULTY" effect [28].
Tune "MULTY" [29]fx and select modulator for it [30]. • If the "BAR \ CLOCK" button [6] is set to the "BAR" position, the patterns and drumsets will change in sync with the start of the bar.
• To cross-fade between patterns press the selected "PATTERN" key again and then press another "PATTERN" key. Set the cross-fade duration use the "CR-F. TIME" fader [24].
• "W" knobs [33] to set what percent of increase or decrease there is to the value of the parameter from the current position, when the "WHEEL" controller is set on max.
• Set the "WHEEL" fader [2] to maximum. Adjust the "W" knobs.
• You can change volume SD, HH and percussion lines with the "VOLUME" faderS [1].
• You can reduce master volume or use the saturation effect with the "VOL. / SAT." fader [5].
INSTALL:
• Unzip files
• Put the drumper2-5.dll file and drumper2-5 folder in your VST plugins directory.
• Start your host programm (Cubase, FL studio etc).
• Scan plug-ins if needed (depends of your DAW).
• Open Drumper like VST instrument.
• Enjoy!
IMPORTANT!
• Do not rename the file drumper2-5.dll.
• If your host software does not "see" Drumper check the path to the VST folder in the program settings.
USING:
• Open DRUMPER like a VST instrument.
• Start the host sequencer.
• Click and hold the "ON!" button [31] (short click for sound stop/pause).
• Press the first "PATTERN" key [19].
• Press the "A" key. [22]
• Set the "MORPH" [17] fader to the left.
The "DENSITY" [10]fader must be set in the central position.
• Select a sequencer I [14].• Select a pattern for the sequencer I [14].
• Edit this pattern or create a new pattern [12].
• Set the "MORPH" [17] fader to the right.
• Select a sequencer II [20].
• Select a pattern for the sequencer II [20].
• Edit this pattern or create a new pattern [12].
• Set the "MORPH" [17] fader in the center or close to the central position.
• Tune the "A" [23] fader.
• Tune the "DENSITY" [10] fader if you need to.
• Similarly, adjust the "B" key and fader.
• If you select the "A-B" key, DRUMPER will play "A" and "B" variations alternately. You can adjust the time switch to "B" variation using "A-B" fader [23].
• You can select the lines (BD, SD, etc.) [7] which will not be changed when changing the value of the "DENSITY".
• Set the "MIX" [18] fader to the left.
• Select drumset [15].
• Click the "DRUMSETS" menu.
• Tune the "PITCH DR 1" fader [36].• Select "1" or "2" mode [3] for "PITCH DR. 1" fader. In the "2" mode the value of pitch will be reversed for every drum beat.
• Select modulator to pitch value for each drum line. [4].
If you select "CENTER", the pitch will change only when moving the "PITCH DR 1" fader. You can also select one of the LFOs as a modulator.
• Select "LFO, MIDI" menu.
• Select LFO waveform [38]. Adjust the faders "SPEED" [40] and "DEEP" [41]. Select the type of synchronization [39].• You can ajust MIDI out channel [42] and MIDI note for the each line (BD, SD etc.) [43, 44]. The MIDI output is activated the button [45]. The MIDI output supports "MIDI note on", "MIDI note off" and "MIDI note velosity" parameters only. The controllers (pitch, filter, etc.) are not transmitted. The "MIDI note velosity" parametr depends on the setting "ACCENT" knobs.
If the "ACCENT" knob is set to the center , MIDI note Velocity = 100.
If the "ACCENT" knob is set to the minimum , MIDI note Velocity = 76.
If the "ACCENT" knob is set to the maximum , MIDI note Velocity = 127.
• Return to "DRUMSETS" menu.
• Set "ATTACK" [32]and "RELEASE" [34] time for DRUMSET 1. Adjust the pan, reverb level, release and pitch for each drum line [35].
• Set the "MIX" [18] fader to the right.
Tune dramset 2 in the same way as dramset 1 [37].
• Set the "MIX" [18] fader in the center or close to the central position and select a modulator for this fader [13].
• Click the next "PATTERN" key [19] and select a pair of patterns [14], [20] and a pair of dramsets [15], [21]. Adjust the faders "MORPH" [17], "DENSITY" [10] and "VAR" ("A", "B", "A-B") [22].
Repeat this procedure with all "PATTERN" keys.
• Select "FX, LOAD WAV" menu.
• Tune reverb "TIME" [46], "COLOR" [50] and "WIDTH" [51]. Ajust gate for reverb [47]. The "tail" of the reverb will turn on and off each playing BD, SD, BD+SD, or percussion depending on your choice.
• Tune delay "TIME" [53], "FEEDBACK" [54] and "MIX" [55]. The delay time is automatically synchronized with the tempo of the host sequencer.
• Tune fazer "TIME" [61], "FEEDBACK" [63]and "MIX" [62]. Assign the modulator to fazer time parameter [64]. Select inverted or normal option of the fazer [65]. "Inv" option sets the LFO modulation in opposite phase for left and right channel.
• Tune filter using the "FREQ." [57] and "REZ." [59]faders. Select modulator fo filter [58]. Select inverted or normal option of the filter [56]. Set the filter to the second drum in the same way [60].
• To download wav files click on the download button [52]. DRUMPER supports stereo and mono samples download but will be played back mono.
It is recommended edit samples in any audio editing program before loading. Best thing disable the sample loop. You can adjust the volume of the loaded samples using an "vol" knobs [49]. These samples will sound if you select 17 or 18 drumset using drum select buttons [15, 21]
• Return to "PATTERN" menu and tune the "ACCENT" [11]knobs if you need to. You can boost or reduce the volume for each sequencer step. The "MIDI note velosity" (MIDI out) parametr depends on the setting "ACCENT" knobs. If the "ACCENT" knob is set to the center , MIDI note Velocity = 100.
If the "ACCENT" knob is set to the minimum , MIDI note Velocity = 76.
If the "ACCENT" knob is set to the maximum , MIDI note Velocity = 127.
• Play DRUMPER using a virtual keyboard or MIDI.
• You can change the patterns and drumsets using "PATTERN" keys or MIDI keys 60-71.• If the "LINK KEYS / UNLINK" button [16] is set to the "UNLINK" position you can change the patterns and dramsets independently. To change dramsets use MIDI keys 48-59, to change patterns - keys 60-71.
• If the "USER / PRESET" button [9] is set to the "USER" position, then when changing presets (a MIDI programm change)settings only will change, but the selected drumsets will not be changed. • Fx processor is controlled by the "FX" keyboard or MIDI.
MIDI keys 76-80 - "REPEAT" effect [20],
key 81 - "DELAY" effect [26],
key 82 - "FAZER" effect [27],
key 83 - "MULTY" effect [28].
Tune "MULTY" [29]fx and select modulator for it [30]. • If the "BAR \ CLOCK" button [6] is set to the "BAR" position, the patterns and drumsets will change in sync with the start of the bar.
• To cross-fade between patterns press the selected "PATTERN" key again and then press another "PATTERN" key. Set the cross-fade duration use the "CR-F. TIME" fader [24].
• "W" knobs [33] to set what percent of increase or decrease there is to the value of the parameter from the current position, when the "WHEEL" controller is set on max.
• Set the "WHEEL" fader [2] to maximum. Adjust the "W" knobs.
• You can change volume SD, HH and percussion lines with the "VOLUME" faderS [1].
• You can reduce master volume or use the saturation effect with the "VOL. / SAT." fader [5].
INSTALL:
• Unzip files
• Put the drumper2-5.dll file and drumper2-5 folder in your VST plugins directory.
• Start your host programm (Cubase, FL studio etc).
• Scan plug-ins if needed (depends of your DAW).
• Open Drumper like VST instrument.
• Enjoy!
IMPORTANT!
• Do not rename the file drumper2-5.dll.
• If your host software does not "see" Drumper check the path to the VST folder in the program settings.