syntler.com

Drumper 2.7 Manual
Basic terminology
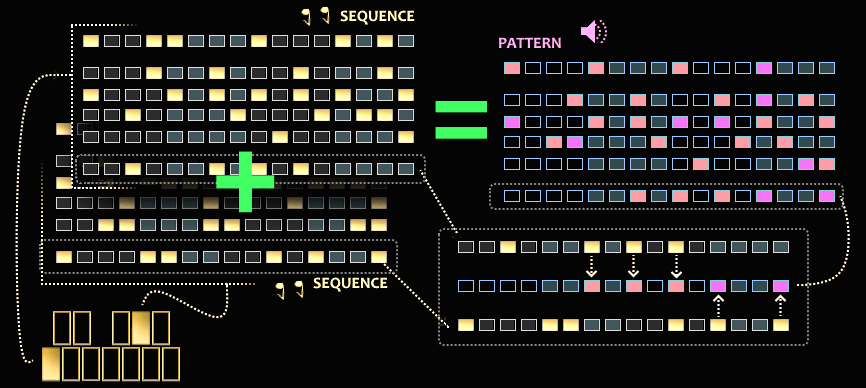
• Sequence - a 16-step rhythmic loop. There are 12 editable sequences in total.
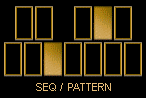
• Pattern - any combination of two sequences created by morphing. There are 66 patterns in total.
 • Step - 1/16th note.
• Beat - the note on the sequencer that plays the sample.
• Sample - a wav file downloaded for each track.
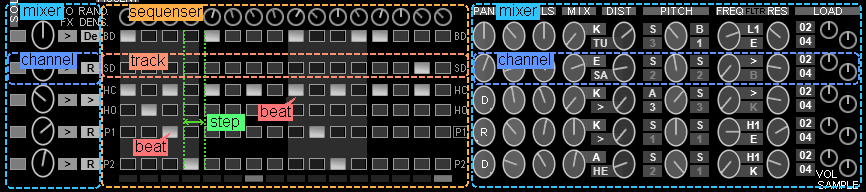
• Track - the Drumper sequencer has 6 tracks. Big drum, snare drum, closed hi-hat, open hi-hat, percussion 1, percussion 2.
• Drumset - set of 5 samples: big drum, snare drum, hi-hat (one sample is used for open and closed hi-hat), percussion 1, percussion 2. There are 12 drumsets and 66 combinations of drumsets in total.
• Channel - virtual mixer channel. There are 5 channels in total. One common channel is used for open and closed hi-hat tracks.
Control from the virtual or MIDI keyboard
To control the DRUMPER, use the 3 octaves on the MIDI keyboard. You can also use the plugin interface or the piano roll of your DAW. Well, and of course, you can draw the desired notes in your sequencer.
Seq/pattern keyboard
The first octave is used to select patterns and sequences. It also starts the sequencer. The cross-fade function is also triggered with this keyboard.
Each key of the Seq/pattern keyboard corresponds to a 16-step editable sequence. To edit a sequence, press any key twice. The DRUMPER will show the Sequence Edit window corresponding to that key. You can turn OFF or ON any notes on the sequencer tracks. If you switch to another sequence or pattern, any changes you make will be saved. To play/edit a pattern (a combination of two sequences), press the two keys on the Seq/pattern keyboard. Each key pressed will trigger the corresponding sequence and Drumper will form a pattern from them in real time. You cannot edit the pattern tracks (add and remove beats). But you can adjust the morphing parameters of sequences with the pattern editing sliders. All settings are automatically remembered for each of the 66 patterns.
To enable the cross-fade function (a smooth transition from one pattern to another), press the first key and hold it down. After the yellow CR.FADE TIME light comes on, press the second key.
Use the STOP key to stop playback. When working with the DAW sequencer, the DRUMPER will automatically stop when that sequencer stops.
Under MAC OS (AU plugin), the stop function (when the DAW sequencer is stopped) does not work. To stop, press the STOP key in the plugin interface or press the corresponding key on the MIDI keyboard.
Drumset keyboard
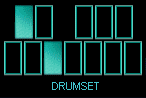
With this keyboard, which also occupies one octave, you can select drumsets, that is, change the sets of samples that DRUMPER plays. The pattern is played with two drumsets at the same time. That is, two samples of bass drum, snare drum, and so on are played at the same time. Each key of the Drumset keyboard corresponds to one set of 5 samples. You can play a pattern with two identical samples if you press one key twice. Two identical sets of samples will play in parallel. For each sample, you can change the pitch setting, which can be used, for example, as a flanger effect. If you press two different keys, they will play different samples at the same time.
IMPORTANT!
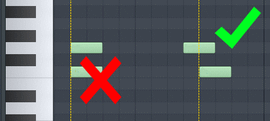 Drumper emulates the operation of analog drum machines. Therefore, it only accepts serial commands. If the two keys on one keyboard section (SEQ/PATTERN, DRUMSET, etc.) are pressed at the same time, Drumper will not work properly. If two notes are input at the same time, only one note will be received. To avoid this, press keys (or send commands to play notes in your DAW) sequentially.
Loading samples
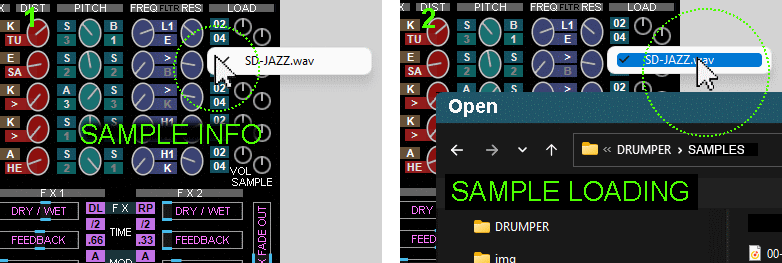 To view the file name, click on the button in the "LOAD" section for the corresponding channel. In the drop down menu you will see the file name (pic 1). On each channel in the "LOAD" section, there are two buttons to load samples. For the two currently selected drumsets. The drumset numbers are displayed on the load buttons.
To load a new sample, click on the file name. A file opening dialog will open (pic 2). When the open file dialog box opens, the VOL SAMPLE control will automatically move to central position. After the sample is loaded you can adjust its volume with the VOL SAMPLE control (-6, +6 dB).
DRUMPER supports loading stereo and mono samples, but the playback will be mono.
Before loading, it is recommended to edit samples with any audio editing program. It is best to disable sample looping. It is also advisable to adjust the volume so that it is approximately equal to the volume of other loaded samples.
To view the file name, click on the button in the "LOAD" section for the corresponding channel. In the drop down menu you will see the file name (pic 1). On each channel in the "LOAD" section, there are two buttons to load samples. For the two currently selected drumsets. The drumset numbers are displayed on the load buttons.
To load a new sample, click on the file name. A file opening dialog will open (pic 2). When the open file dialog box opens, the VOL SAMPLE control will automatically move to central position. After the sample is loaded you can adjust its volume with the VOL SAMPLE control (-6, +6 dB).
DRUMPER supports loading stereo and mono samples, but the playback will be mono.
Before loading, it is recommended to edit samples with any audio editing program. It is best to disable sample looping. It is also advisable to adjust the volume so that it is approximately equal to the volume of other loaded samples.
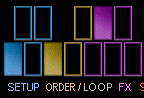
SETUP keyboard
Only 4 keys. Serves for switching mixer, reverb, LFO and general volume settings. You can memorize a total of 10 settings and recall any of them using the SETUP keypad. To recall one of the 10 sets, press any two keys or press one key twice.
ORDER / LOOP keyboard
Enables the order mode, which plays the pattern not from the beginning to the end (1 to 16 steps), but in a different order. There are a total of 8 options for playing a pattern. There is also a LOOP mode that starts a cycle of one to 8 steps from the time the key is pressed. For each key, you can turn on either the ORDER mode or the LOOP mode. To do this, simply press one of the keys and select a mode for it from the ORDER/LOOP drop-down menu.
FX keyboard
Changes FX processor settings and switches channel assignments to FX processors. Each key "remembers" its settings.
Zone knob - adjusts the ORDER/LOOP and FX keyboard split.
Memory
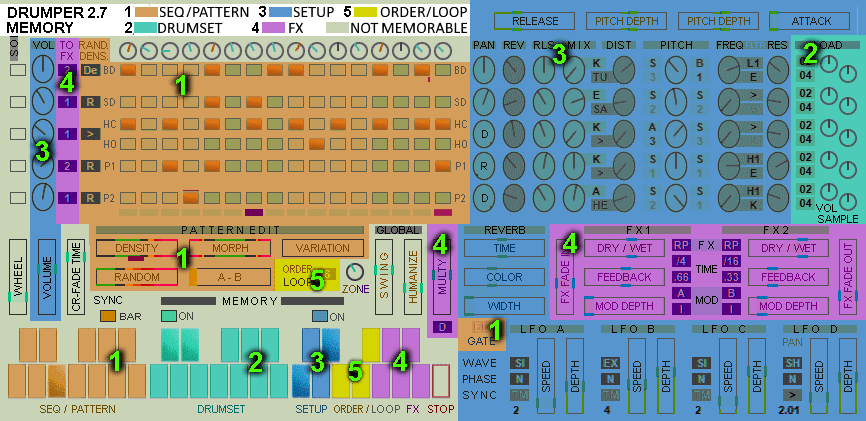
You can save a large number of settings for each pattern. The memory is organized as follows:
For each sequence, the DRUMPER automatically saves: The position of the beats on the tracks, Reverb gate setting value.
For each pattern, it automatically saves:
Controller positions
RANDOM
MORPH
VARIATION
DENSITY
A-B.
Enables or disables the RANDOM and DENSITY controllers for each track.
Reverb gate setting value.
Turning ON Drumset memory (the MEMORY button above the Drumset keyboard) will memorize the combination of drumsets for each pattern or sequence. As well as the position of the volume correction knob for each sample (LOAD section).
When you turn ON Setup memory (the MEMORY button above the Setup keyboard), the corresponding setups will be stored for each combination of drumsets. Including all mixer settings (VOL, PAN, PEVERB, MIX, MIX MOD, DIST TYPE, DIST LEVEL, PITCH MOD and PITCH STEPS 1, 2 (for each of the two drumsets), PITCH, FILTER TYPE, FILTER FREQ, FILTER RES), general volume setting and reverb settings (except for REV GATE setting), Overall ATTACK, RELEASE, PITCH DEPTH 1, 2.
Thus, if memory is enabled, when you select a sequence or pattern, a combination of drumsets and one of 10 Setups will be automatically selected.
All controllers
A-B (slider, SEQ) - Drumper creates two variant (A and B) of a pattern from two selected sequences. Slider A-B controls how many steps of the pattern B will be played. This can be seen by the indicator under the sequencer (light blue). The two indicators on the A-B slider show which variant is currently playing. The left indicator is A, the right indicator is B.
ACCENT (knob, GLOBAL) - adjust the volume of each step of the sequencer (for all tracks simultaneously).
ATTACK (slider, GLOBAL) - attack of the volume envelope. Applies to all played samples.
COLOR (slider, REV) - the character of the reverb sound. Changes the frequency response of the reverb.
CR.FADE TIME (slider, GLOBAL) - crossfade time from one rhythm pattern to another when crossfade mode is on.
DENSITY (slider, SEQ) - Slider for adjusting the "density" of the rhythm pattern. The standard position is in the center. If you move the slider to the left, there will be pauses in the rhythmic pattern. At the extreme right position both patterns will be played at the same time.
DEPTH (slider, LFO) - LFO depth.
DIST (knob, CHANNEL) - adjusts the level and character of the Distortion effect.
DIST TYPE (menu, CHANNEL) - turns the Distortion off or selects the Distortion type.
DRY/WET (button, SOLO} - turns off/on the reverb and fx processor when listening in SOLO mode.
DRY/WET (slider, FX) - ratio of direct and processed signal.
FEEDBACK (slider, FX) - amount of feedback. Increases or decreases the length of the "tail" of the delay (phaser).
FILTER FREQ (knob, CHANNEL) - filter frequency.
FILTER RES (knob, CHANNEL) - filter resonance.
FILTER TYPE (menu,CHANNEL) - selects the filter type.
FILTER MOD (menu, CHANNEL) - selects the modulator that changes the filter frequency.
FX FADE IN (slider, FX) - Sets the time for which the ratio of direct to processed signal (DRY/WET) changes from 0 (DRY) to the value set by the DRY/WET slider.
FX FADE OUT (slider, FX) - Sets the time over which the ratio of direct to processed signal (DRY/WET) changes from the value set by the DRY/WET slider to 0 (DRY).
FX SEL (menu, FX) - selects the type of effect. Three options are available: delay, phaser and repeat (delay with infinitely repeating cycle while the key is pressed).
HUMANIZE (slider, GLOBAL) - randomly shifts the position of beats and randomly changes their volume within a small range.
LOAD (menu, DRUMSET) - sample loading menu.
MEMORY DRUMSET (button, GLOBAL) - to enable/disable memory for the selected dramsets. If memory is on, each combination of patterns is memorized with a combination of drumsets. If the button is in "OFF" position, when you change patterns, the combination of patterns will not change.
MEMORY SETUP (button, GLOBAL) - the button turns on/off the memory for the selected drumsets. If the memory is ON, then for each combination of dramsets a different set (one of 10) is memorized. If the button is in OFF position, the setup will not change when changing the dramsets.
MIX (knob, CHANNEL) - sets the mixing ratio of the two samples (drumset 1/drumset 2).
MIX MOD (menu, CHANNEL) - dynamic mixing of samples. The MIX parameter is controlled by the selected LFO or volume envelope.
If you set ENVELOPE as a modulator, the Mix knob will work as follows: In the center position, the two samples are simply mixed. In the extreme left or extreme right position, the effect is maximized. During playback, the volume of first sample decreases and the volume of the second sample increases according to the volume envelope. This effect is most noticeable when using samples that are not very short.
MOD (menu, FX) First menu selects the modulator for the delay (phaser).
Use the second menu to invert the phase of the modulator signal for the right channel.
MOD DEPTH (slider, FX) - modulation depth of the delay (phaser).
MORPH (slider, SEQ) - if you set this slider to the left, one of the two selected patterns will play. If you set it to the right, the other pattern will be played. When this slider is in the middle position, the rhythmic pattern will be formed from the two patterns equally.
MULTY (slider, FX) - the Multy effect repeats the attack of a bass or snare sample (some notes) multiple times. The slider adjusts the repetition rate. This parameter can be controled using the LFO or manually. The Multy slider is sensitive to movement. That is, the Multy effect will turn ON when you move the slider. Also, this effect will be activated when pressing the rightmost key on the FX keyboard.
MULTY MOD (menu, FX) - select modulator for MULTY effect.
ORDER, LOOP (menu, GLOBAL) - selected separately for each key of the ORDER/LOOP section. You must first press one of the keys in the ORDER/LOOP section and select a mode for it. ORDER or LOOP. In the ORDER mode, the rhythmic pattern will be played in a different order. For example, in reverse order. There are a total of eight playback options. In LOOP mode, when you press the corresponding key, the rhythm pattern will loop from the moment the key is pressed. You can select LOOP from 1 to 8 steps. The LOOP/ORDER keys are used to create rhythmic breaks and bridges.
PAN (knob, CHANNEL) - pan control. In the extreme right position (D), the dependence on LFO D is turned on. In the extreme left position (R), each next beat will be panned randomly.
PHASE (menu, LFO) - change the phase by 180 degrees.
PITCH (knob, CANNEL) - adjusts the pitch, which applies to two samples (of the two selected drumsets) simultaneously.
PITCH DEPTH (slider, GLOBAL) for each drumset - sets the pitch depth for step changes (when "steps" is set to "2" or "3" in the "steps" menu). Also affects the overall pitch setting. If "SCRATCH" is selected in the modulators menu, the PITCH DEPTH slider does not work.
PITCH MOD (menu, CHANNEL) - selects the modulator for pitch. One of the 4 LFOs or SCRATCH mode. In SCRATCH mode, the pitch changes over a wide range as you move the wheel controller (MIDI controller 1, standard modulation wheel). When you stop moving the controller, the pitch value returns to the original level.
PITCH STEPS (menu, CHANNEL) - step-by-step change of pitch. Choose from three options. Off, every two beats, and every three beats.
RAND. DENS.(menu, CHANNEL) - enables or disables the RANDOM and DENSITY sliders for each CHANNEL.
RANDOM(slider, SEQ) - adds randomness to the formation of the rhythmic pattern. At the minimum value randomization is turned off. The larger the value, the more "jazz" there is.
RATE (indicator, LFO) - shows the LFO speed in Hz or in fractions of a bar.
RELEASE (slider, GLOBAL) - release of the volume envelope. Applies to all played samples.
REV (knob, CHANNEL) - add reverb.
REV GATE (menu, REV) - selects the tracks on which the reverb will be turned on or off when playing each next bit.
RLS (knob, CANNEL) - release of the volume envelope.
SOLO (button, CANNEL)) - to listen to individual tracks while editing.
SPEED (slider, LFO) - LFO speed.
SWING (slider, GLOBAL) - changes the duration of strong and weak beats, creates a characteristic swing pulse.
SYNC (button, GLOBAL) - Selects whether the pattern will play from the beginning of the next measure or immediately from the next beat after the key is pressed.
SYNC (menu, LFO) - synchronize the start of the LFO waveform. BAR - LFO restarts at the beginning of each bar. TEMPO - LFO synchronizes to the tempo. You can set the number of LFO cycles per bar (16 sequencer steps) with the SPEED slider. This division is not strictly arithmetic. For example, if you set the value to 3, then 2 LFO wave cycles will be 5 sequencer steps long and another cycle will be 6 sequencer steps long. In this way, the beginning of each LFO wave cycle in TEMPO mode always coincides with a sequencer step. In addition, the LFO cycles will shift depending on the SWING parameter setting. These rules apply to all waveforms except SAMPLE-AND-HOLD. If this LFO waveform is selected, it will be synchronized to the tempo in both TEMPO and BAR modes. In BAR mode, the sample-n-hold pattern will repeat every bar, while in TEMPO mode the pattern will be random. OFF - disable synchronization.
TIME (slider, REV) - reverb time.
TIME (menu, FX) - the first menu sets the delay time in fractions of a 16 step pattern for the left channel. The second menu sets the right channel delay time relative to the left channel delay time.
TO FX (menu, CHANNEL) - selection of FX for the channel. Four options: Off, first FX only, second FX only, both processors (in parallel).
VOL (knob, CHANNEL) - volume control of each channel.
VARIATION (slider, SEQ) - Changes the way the patterns are mixed. It greatly changes the rhythmic pattern.
VOLUME (slider, GLOBAL) - the overall volume. There is also a level indicator and overdrive indicator.
VOL SAMPLE(knob) - adjusts the volume of the loaded samples. When a new sample is loaded, it is automatically set to the zero position.
WHEEL (slider, GLOBAL) - controller for simultaneous change of several parameters. Corresponds to MIDI controller 1. Standard modulation wheel, as on almost all MIDI keyboards. With this controller, you can simultaneously change such parameters as pitch depth, overall attack and release of the volume envelope, speed and depth for all LFO.
Set the WHEEL slider to minimum. Adjust the parameters of pitch, attack, release, speed and depth of the LFO. Then turn the WHEEL slider (or the modulation wheel on the MIDI keyboard) to maximum. The pitch, attack, release, speed, and LFO depth sliders will change color to bright green. Set the new positions of these sliders. Now, the WHEEL slider can adjust the above parameters simultaneously. Each parameter will change between two user-defined positions as you move the WHEEL slider from minimum to maximum.
WIDTH (slider, REV) - expands or narrows the reverb stereo image.
WAVE (menu, LFO) - selects the waveform.
ZONE (knob) - divides the ORDER/LOOP and FX keyboard into two zones. You can change the number of keys that control the corresponding blocks.
DRUMPER 2.73 tested under Windows 11 Pro
and Mac O.S. 12.6.3 Monterey
Please let me know here if you have
any problems with installation and operation.
Download Drumper v. 2.7 (demo)
Drumper v. 2.7
$29